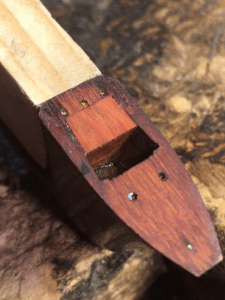
Restoration to two pin-cracks at the back of the head of an F.X. Tourte cello bow.

1. Here you can clearly see the pin cracks. As you will note from the third pic, the ‘wall’ at the back of the mortice is very thin – especially as this was originally cut back (towards the bottom of the mortice), in Tourte’s typical way. The only way for me to consider restoring this with any hope of longevity, was to figure a way of ‘reinforcing’ the repair to the cracks. Here is how I went about this:

2. Interestingly, when I had removed the headplate, I noticed that, as you can see from the pic, there had been previous pins in the head. This told me that the headplate probably wasn’t original – which pleased me, as I wanted to make the back wall of the mortice a bit thicker than it was at that point and would therefore need to make a replacement silver headplate.

3. This shows the typical shape of the back of the mortice: at the thinnest point, this pernambuco end-grain is probably only about 2mm thick!

4.  These pics shows the back of the head soaking in cold water (but not allowing the water to spill into the mortice). The cracks had previously been glued up with super glue, so this process is after much time, dissolving the glue and washing it out with a combination of – in turn – ‘super-solvents’, acetone and boiling water, locally applied. The idea of the cold water is to allow the wood to find it’s natural position again, once the glue and been removed from the cracks.

5. I then let it dry out slowly, in a fairly humid room, then super-glued it back together:

 6. But now for the tricky (and quite scary) part!  How to reinforce it…
I firstly fitted a piece of soft-wood (pine) to the back of the head, glued on with ‘white glue’ (P.V.A. wood glue) for protection:
 

7. With the back wall of the mortice stable, I began to cut the interior end-grain flat:

8. ….so that I could fit a temporary piece of wood in the mortice:

9. I glued this in then levelled it off:

10. The point of this temporary plug, was to provide a solid area for the cutting of a channel (which would then house the definitive reinforcement).

Preparing for the cut of the channel, I temporarily fitted two small aerials of wood, so as to be able to be sure that I had set up the bow in the correct position in the milling machine! As there is so little wood (and as, of course, the width of the head tapers down in thickness), the cut had to be absolutely accurate!

 11.  I then made a ‘jig’ to contain the head of the bow, to protect it when being cramped in the milling machine’s vice (very roughly hewn out of pine):
 

12.  So here it is, aligned and cramped in the milling machine:

13. (Then the aerials are broken off):

14. …and then the channel is very slowly milled out:


15 …until it is just a little deeper than the mortice:


 16.  I then made a 2-ply laminate of pernambuco (for the ‘reinforcement’) – I made a few, to have a choice of end-grain:

16.  I then made a 2-ply laminate of pernambuco (for the ‘reinforcement’) – I made a few, to have a choice of end-grain:

18.  ….And then very carefully began fitting the reinforcement:

19. Once I had fitted this piece a few millimetres deep, I then removed the temporary mortice plug:

20. This permitted me to check the accuracy of the channel cut and enabled me to continue the fit with greater ease. Here you can see how the reinforcement was fitting at the stage when I removed the plug:

21.  I then continued filing the reinforcement until it fitted snugly all the way to the bottom of the channel:

22.  I glued this in with super-glue, then filed it flush with the surface of the head and then removed the ’safety pine’ at the back of the head. Of course, this was the ‘moment of truth’: would the initial glueing up of the pin cracks have survived the work for the reinforcement? I was confident that all would be well….and as you can see from the back of the head, all was well!:

23.  I then re-bushed all of the holes for the pins:

24.  ….and made a note of where centres of these bushings were:

25. So then new ebony (one-piece):

26.  And then the silver (old silver!) tied on:

27.  ….and the mortice roughly cut out:

28.  The headplate is pinned, polished (and ‘antiqued’ a bit), and the inside of the mortice reinforcement cut to the form of an FXT:

29. The final results: a beautiful, classic ‘golden-period’ F.X. Tourte cello head, which is robust again for many, many years to come: