Bow, Techniques
Removing a Crack in the Thumb Projection

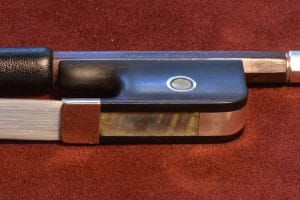
A common crack on the thumb projection of the frog has long been repaired using super glue and ebony dust as fill; this repair leaves a conspicuous shiny line. The technique that we prefer utilizes the end mill and matching ebony strip to remove the crack.


Materials &Tools
- Paper Towels
- Cyano Acrylate (CA) – Thin Red ‘Hot Stuff’
- Alcohol
- Mini Screwdriver
- Dental Tape
- Parallel Pliers
- Machining Mill
- 3 Way Tilting Machine Vise
- 2 Flute, Solid Carbide, Center Cutting, Square End Mill (micro: .5mm, .6mm, .8mm diameter) longest length of cut as possible
- Ebony strips (.5mm, .6mm, .8mm)
- Hide Glue
- Glutaraldehyde
- Knife (wider angled blade)
- Burnisher
- 3M 7445 Light Duty white Scotch-Brite Pad
- File
- Bow Makers’ Chisel
- Steel Wool (fine 000)
- Abrasives (squares of sandpaper grits 600 and 2,000)
Prepping the Frog
Remove the underslide by carefully unscrewing the eyelet with the parallel pliers, and unscrewing the screws if there are any in the underslide.
Then use the dental tape to release the underslide by sliding it between the feather-edge of ebony and the underslide plate. Work it all or most of the way under the plate carefully, trying not to damage either the ebony or the underslide. Eventually the underslide should release. If there are pins in the underslide, you can leave them in place while removing the underslide plate with dental tape, the plate should just lift out over the pins. You can leave the pins in the frog to help register the underslide plate later, however, if the pins get in your way during the milling process you can try removing them by carefully tugging on them with pliers or with a chisel, or you might have to mill them out.
Keep all the parts in a labeled plastic bag to help keep them together and away from harm.
Clean the frog with alcohol. If the crack is not moving, evaluate if it is glued properly so the two sides of the crack meet up nicely and are level. If all looks good then just clean the frog and the area of the crack with alcohol. If the crack has been glued poorly in the past, or has come open, you might need to remove the residue in the crack with a very sharp skinny knife. Once the crack has been thoroughly cleaned so that both sides of the crack can be returned as close as possible to their original position, let it dry. Then hold the crack in its original position and re-glue it using the thin red CA.
Setting Up the Mill
First, select the best end mill for the job. Try to use the smallest possible end mill that is large enough to hit all of the edges of the crack while milling a straight line over the crack.
If the crack is slightly wavy and does not go in a straight line, a slightly larger end mill might be necessary. The end mill should have as long of a cutting length as possible and a width that corresponds to the ebony strips that we use to fill the crack: .5mm, .6mm, and .8mm.
Next, determine if the crack should be milled from the inside of the underslide or from the outside of the thumb projection. Take into account the length of the end mill’s cutting surface, the depth of the crack, and the positioning of the frog in the vise. Ideally, every visible part of the crack will be milled away.
First, put the frog into the 3-way tilting machine vise. In order to do this safely, use cauls on the sides when needed, and protect the rails and feather-edge of the underslide area using a shim or jig. This way, the only pressure being put on the frog is in the middle of the frog, not on any delicate edges.
Aligning the Cut
1. Start aligning the angle of the depth of the crack to the angle of the end mill by adjusting the vise so that the end mill will cut at the same angle as the crack. To help match the angle lower the end mill in front of the crack to see if the angles match and the end mill covers up the entire crack. Also check that the end mill cutting surface is long enough to cut all the way through the crack.
2. Align the pathway of the mill with the length of the crack by hovering the end mill just above the crack, and tracing it over the top, as if you were cutting it. If the pathway of the end mill diverts to the right or left of the crack while mimicking the cut, adjust the swivel of the vise to line up the entire length of the crack. When it is well aligned, confirm that the width of the end mill will remove the entire crack.
3. While the end mill is hovering just above the crack, make sure that the amount of space between the end mill and the crack remains fairly consistent from the start of the crack to the end of the crack. Try to take even cuts, not going in deeper on one side than the other.
Make sure all the vises are locked down, the end mill is secure, and only the dial to move the carriage in the path of your cut is free to move.
When using really small end mills, remember that they are very fragile and it is worth taking some time to make the cut. I also recommend having a back-up end mill, just in case one breaks while cutting.
Once everything is aligned and you’re pretty confident that you’ll be able to mill out the crack successfully, slowly mill a hole down at the end of the crack, as if using a drill. This will help to not break the end mill at the end of the cut.
Then, back the mill all the way out and start taking small cuts by running the cutter the entire length of the crack and stopping where the drilled hole is, then moving the mill only .1-.2 mm lower for each successive cut. Keep going until the end mill goes all the way through, or the cutting surface of the end mill bottoms out.
Back out the mill and once you are sure you are finished cutting, remove the frog from the vise.
Filling the Crack
Find a matching strip of ebony that is the same width as your end mill. (This example is .5mm thick) Match the angle of the ray fleck as well as the grain.
Reasons for Matching the Ray Fleck (Medullary Rays)
- Matching the ray fleck helps to hide the repair. The rays have a distinct look and making sure they show in the right places will help the new wood look more like the original. No touch-up will be applied to the repair, so matching as many wood characteristics as possible is extremely important in order to hide the repair.
- Matching the ray fleck helps to align the wood orientation so that during changes in humidity, the new wood will expand in similar directions and proportions as the original wood. This prevents the new wood from pushing and pulling away from the original, undoing the repair.
Finding the Ray Fleck
On ebony, it can sometimes be very difficult to find ray fleck. Using a loupe or a microscope can help find them. One of the best places to locate them on a frog can be on the sides of the thumb projection.
On the surface, they look like little grey/silver/brown flecks
In this example, the milled surface is running parallel to the rays, so the ebony strip has the large ray flecks appearing on the surface. From the end grain (the back of the frog) or the very end of the thumb projection, the rays look like little straight lines going in a perpendicular direction to the growth ring lines.
Once a matching strip of ebony has been found or made, finish the end of the ebony inset with a file. The finished angle of the ebony strip should be such that the grain matches the grain orientation of the original wood, and end of the strip should be rounded to match the shape of the end of the cut. 

When placing the ebony strip into the cut, there should be no gaps at the end of the cut or the length of the cut.
Once fitting properly, trim the ebony strip to be closer in size to the frog and clean both the milled crack and the ebony strip with alcohol and let them dry thoroughly. Glue them together using hide-glue. Clamping is not necessary if it fits properly, it might only add risk of torquing and compromising the fit.
To make the glue insoluble to water and sweat, apply Glutaraldehyde to all glue joints with a Q-tip or sharpened toothpick. It is a good idea to wear gloves, eye protection, and to only work with Glutaraldehyde in a well-ventilated area.
Let it sit overnight to dry, if possible.
The main reason why thumb projection cracks are so common is that the ebony of the thumb projection shrinks through the years but the metal underslide does not, thus creating a crack in the ebony. It is important to accurately re-fit the ebony underslide surface to the metal underslide in order to avoid putting stress on the crack area. As you trim down the ebony strip on the inside of the underslide with a bow makers’ chisel be sure to check the fit of the metal underslide. Once the fit is good, re-glue the underslide.
Replace the screws and pins and eyelet. Then carve down the excess ebony on the thumb projection with a knife that has a high-angle blade, which helps scrape the wood and not tear-out the new ebony.
When the new ebony is almost flush to the original material, finish it using 600 and 2000 grit sand paper rolled into a cylinder. Apply some mineral spirits to help you see any bumps and to lubricate the sand paper, then burnish over the area with a piece of wood or a metal burnisher.
Use a light duty white Scotch-Brite pad to help match the surface of the new wood with the original patina of the frog, and sparingly use the 000 fine steel wool to do the same. Also try burnishing the surface with a piece of leather and your fingernail. Polish the surface of the frog lightly with shellac and use the Scotch-Brite pad and leather to remove the shellac and give the whole frog a uniform look.


