
Bow, Techniques
Making a Thumb Leather

Oct

The thumb leather can help you grip the bow, but it can also make your bow more stylish. In this post I will list the materials you will need to make a thumb leather, show you the different kinds of leathers that we use in the shop and describe their attributes, and give you step-by-step instructions on how to cut and apply a new “seamless” thumb leather.
MATERIALS AND TOOLS
-Sharp scissors
-Pen
-Water
-Paper towels
-Knife
-Mineral spirits
-Q-tips
-Scotch tape
-Fine steel wool
-Blue painter’s tape
-Ruler
-Thick rubber band that has been cut to make a long rubber band strip
-New razor blade
-Razor blade holder
-Strop
-Shiny ceramic tile, or piece of glass
-Aliphatic resin (aka wood glue)
-Flat wood ‘paddle’ or wood stock
-Kiwi black shoe polish
-Thin strip of cotton rag, shoe lace or other soft small rope-like material
-Ruler
-Leather of choice
Optional items that might be needed:
-Straight edge
-Thin rubber band
-Hemostat
-Solder
-Soldering iron
-Flux
-Cyanoacrylate (super glue)
-Digital calipers
Leathers
Our mainstay thumb leathers are made from goat, lizard, and bullfrog skins (calf-skin stretches too much for making a precise thumb leather). We get our leathers from ethical sources when possible and try to get the most out of our skins by cutting them conservatively.
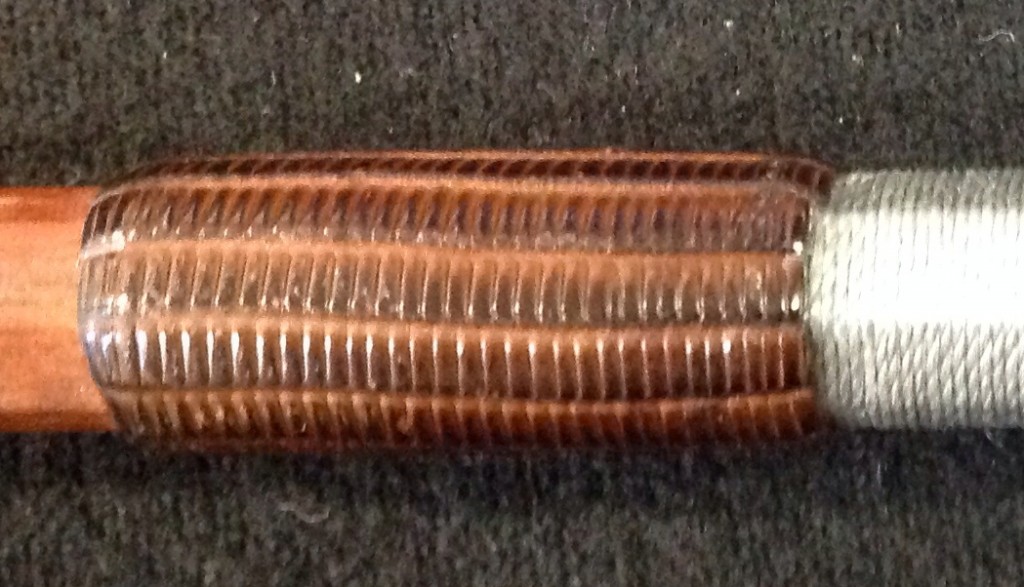
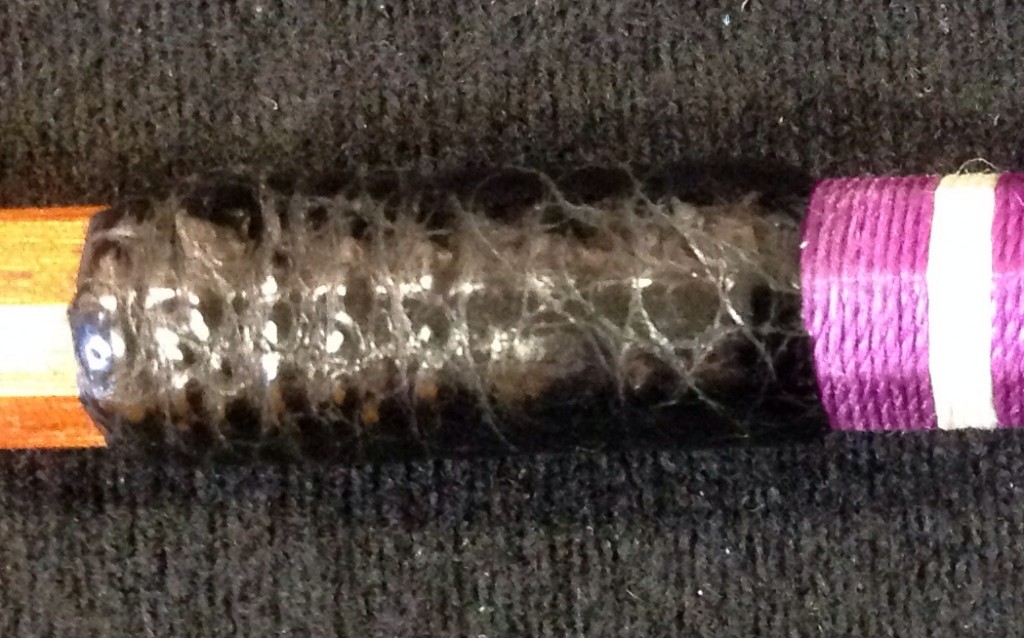
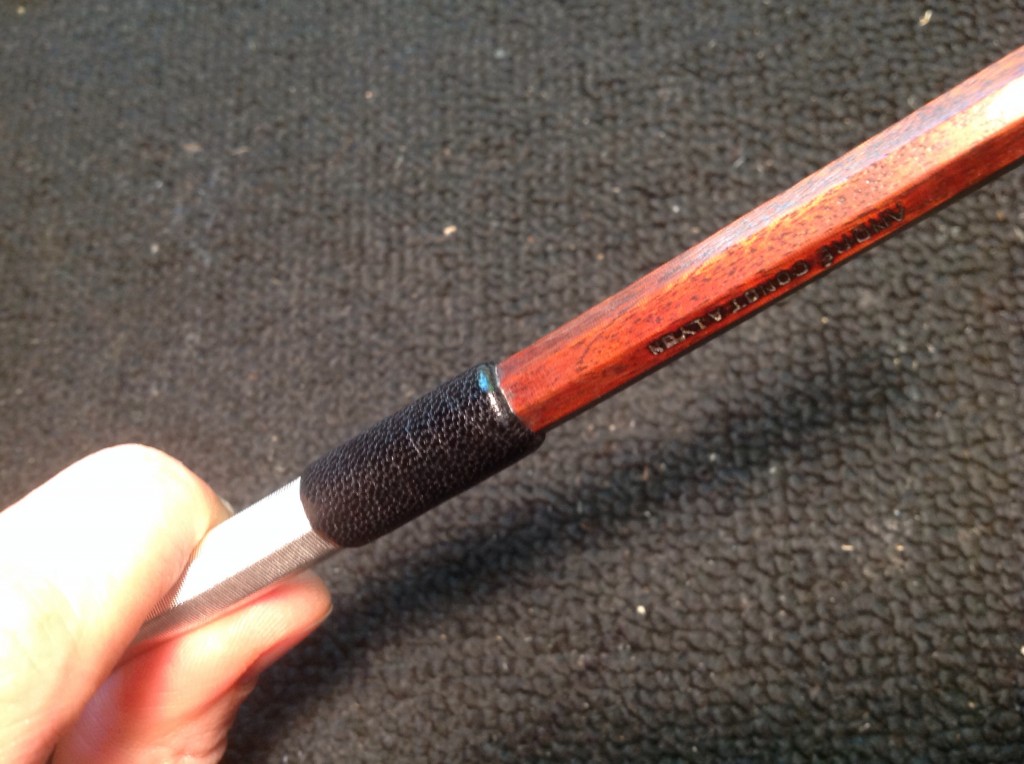
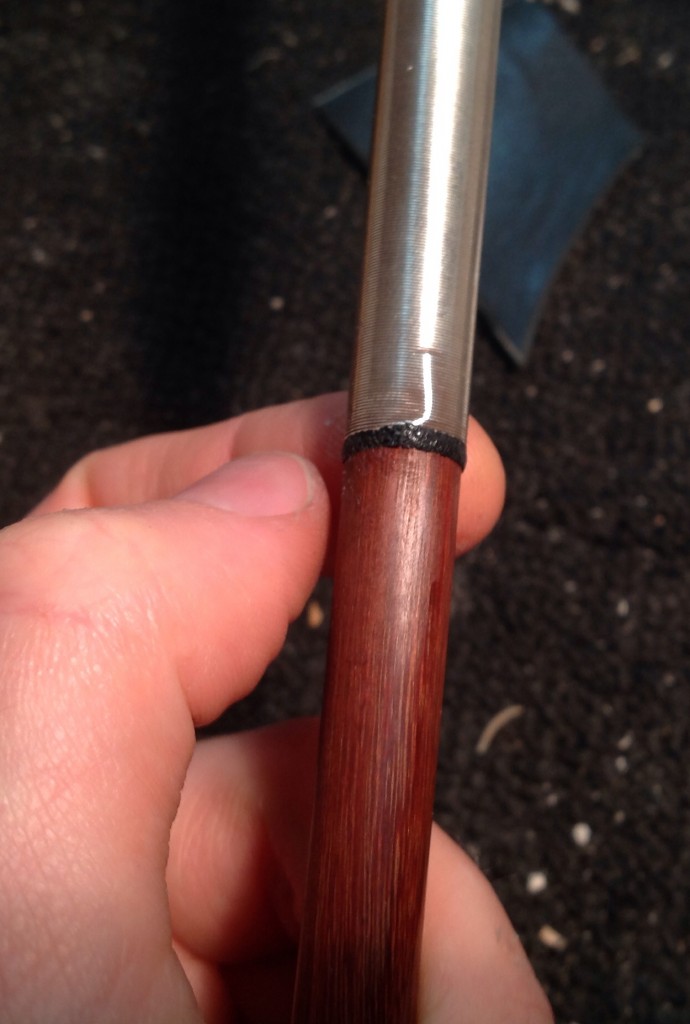
Goat [1] – This leather is our most popular leather in classic black, although it comes in other colors too. It is durable, yet soft, smooth in texture, and easy to work with. This is also the leather I am using for the pictures in this article.
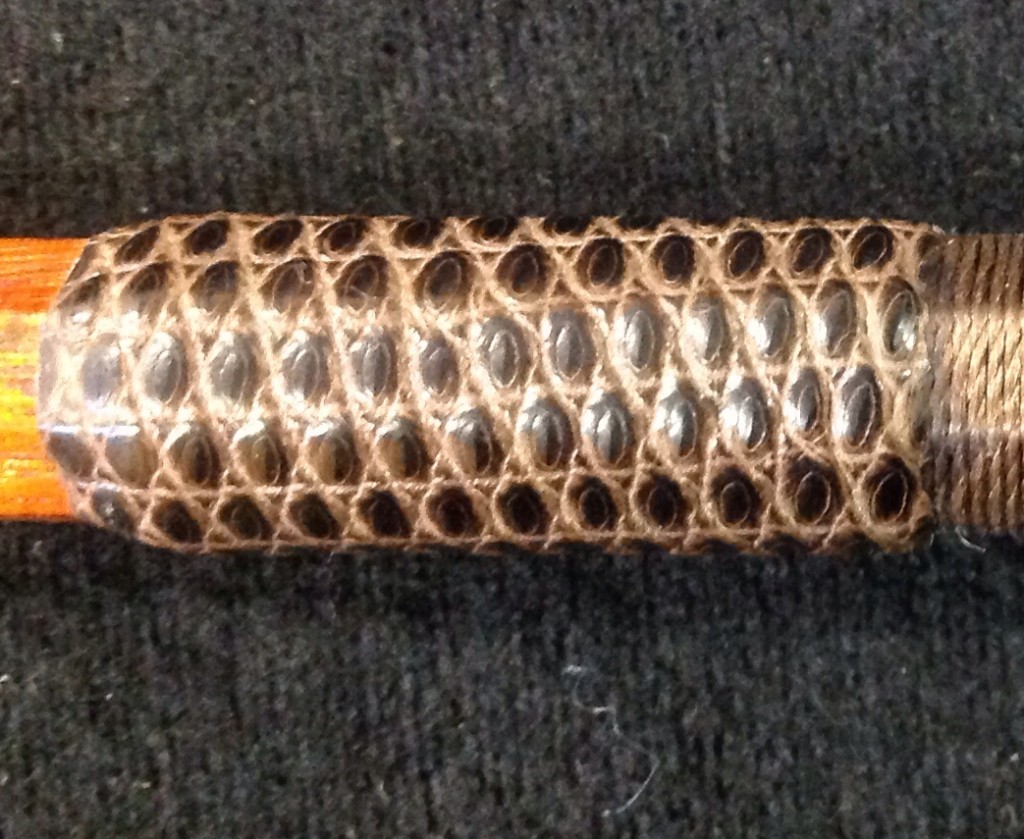
Lizard– This leather is step above the goat skin in durability, some prefer the shiny quality and unique textures to give their bow a sharp look. It also comes in many colors and is fairly easy to work with (maybe slightly more difficult to cut nicely), and doesn’t stretch as much as the goat skin. It is traditional to pair a lizard thumb leather with a whale-bone (real or imitation) wrap.
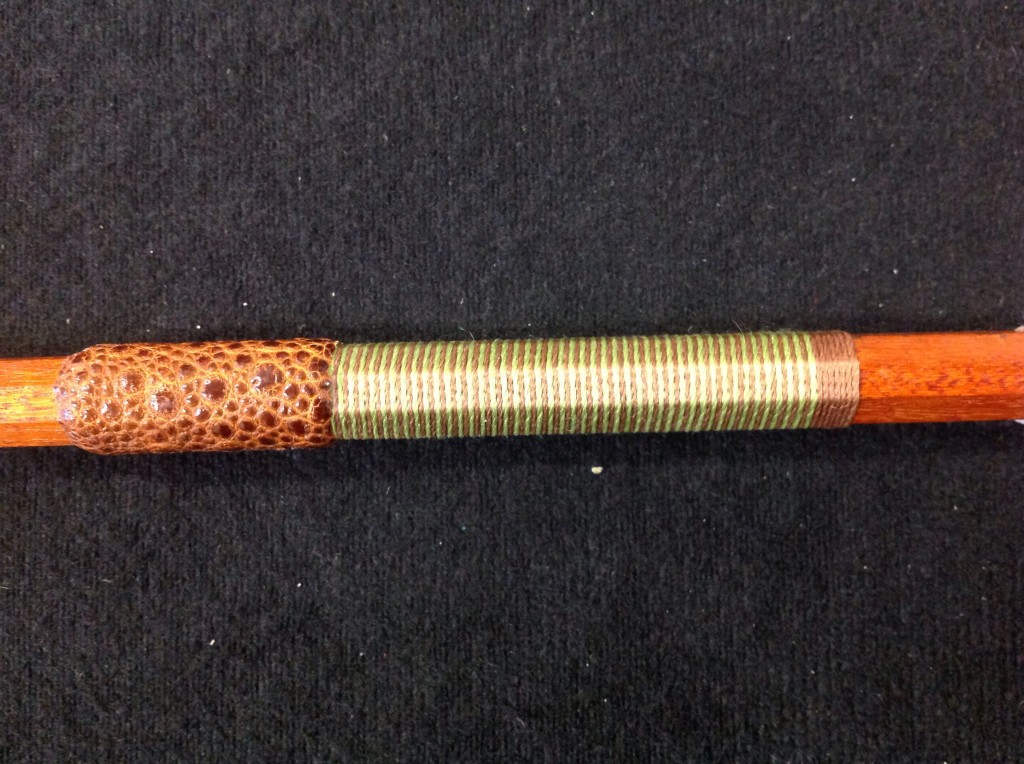
Bullfrog– This is our most durable leather with a distinctly different texture. It is a little more difficult than working with goat or lizard, so try to get a thinner and flexible bullfrog leather to make it easier. It’s slightly trickier to cut, but that improves with practice and a sharp razor. It also looks great and comes in a variety of colors.
Preparing Goat Leather for Efficient Use
If you plan on doing many goatskin thumb leathers, I recommend cutting the leather into long strips and rolling them up, for time efficiency and convenience. The width of the strips is slightly wider than the final thumb leather measurement; around 30 mm wide (a finished thumb leather will be 25 mm). On the underside of the leather, use a straight edge and with a pen, draw a straight line as close as possible to a long edge of the leather and cut the leather on this line with sharp scissors. Save any trimmings that could still be used for thumb leathers. Then measure approximately 30 mm inside the leather from the previous cut and make a dot, do this several times down the length of the straight cut.
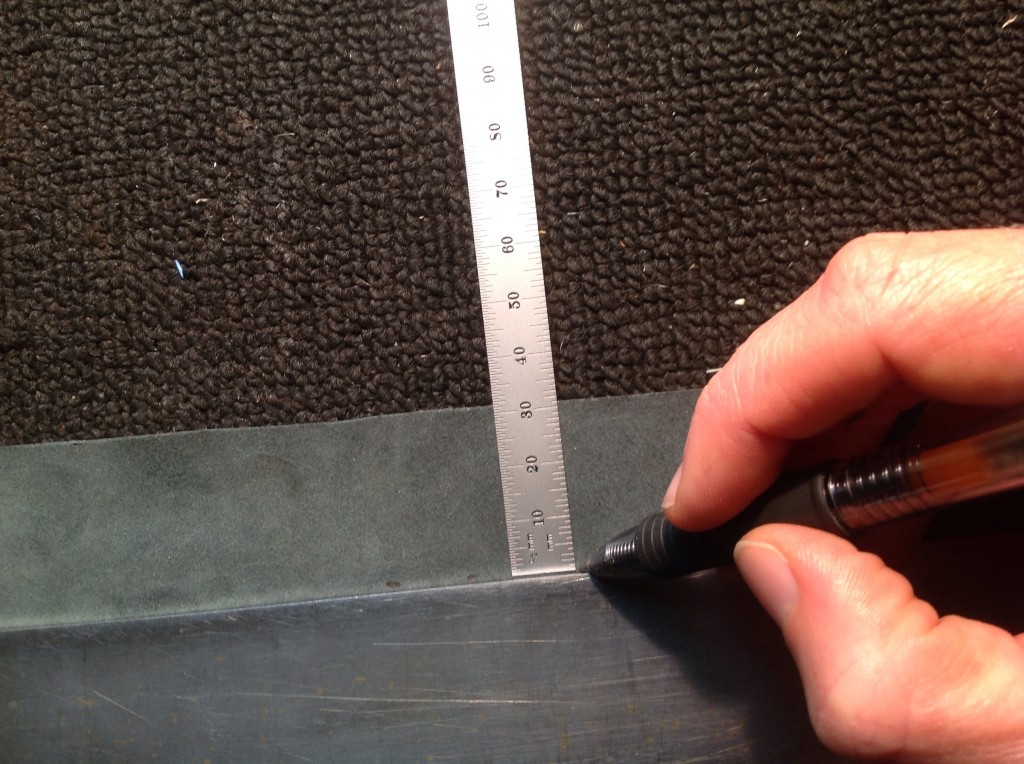
Connect the dots using a straight edge and mark this line using a pen. Cut again with scissors on the line, then roll up without kinks and with outside finished leather facing out and keep a loose rubber band around the roll.


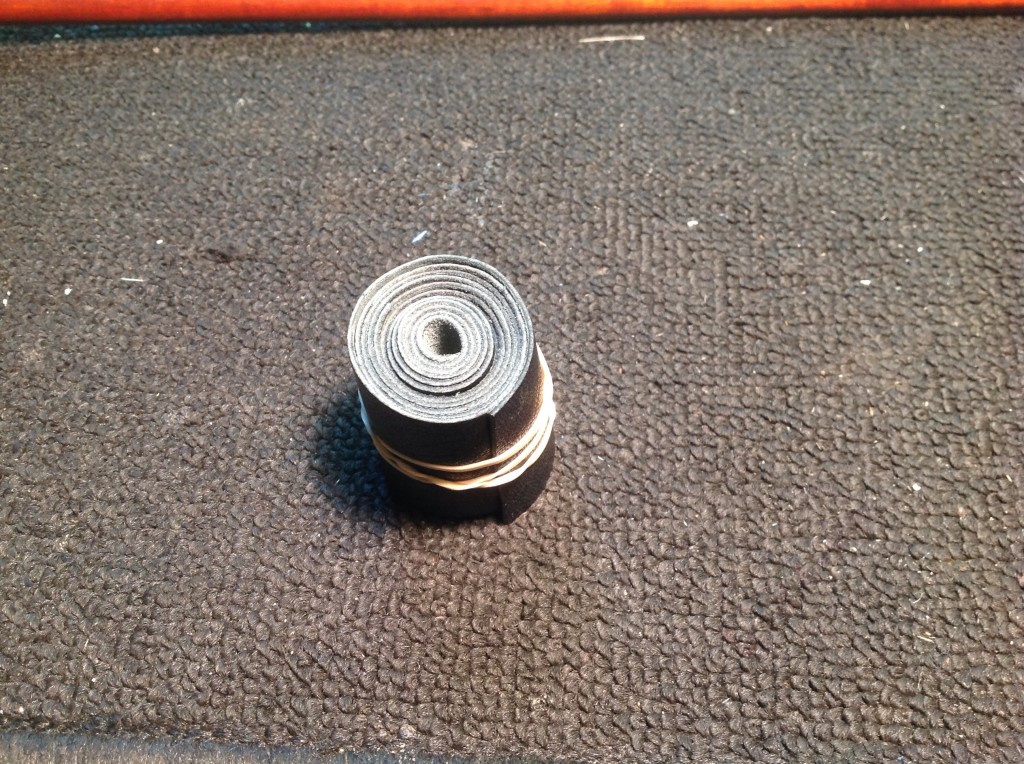
There you have it: thumb leather stock for easy use!
Removing Previous Thumb Leather
If the bow you are using still has a thumb leather attached, take note of how long it is. If you are not doing a new winding, you might have to do a wider thumb leather depending on where the winding stops. If the winding is shorter than 51 mm, you will need a slightly longer leather.
The old leather must be completely removed as well as any ‘filler’ materials underneath.
First, put scotch tape around winding close to previous thumb leather, this will help prevent it from unwinding too far if the thumb leather is the only thing that is keeping it in place. Then, try to pry off the old thumb leather with your fingers, and if it doesn’t want to come free, take a thin piece of paper towel (just wide enough to cover the thumb leather, no longer) and wrap it around old leather. Soak it with water and wait a couple minutes, this should help loosen the old glue.

If it’s extremely stubborn, on the facet of the bow where frog mortise is located, use knife to carefully score a line on the outside of old leather (be careful not to cut or scratch the winding or stick under the leather!). This will aid removing the leather.
Assessing and Removing Filler Material Under the Thumb Leather
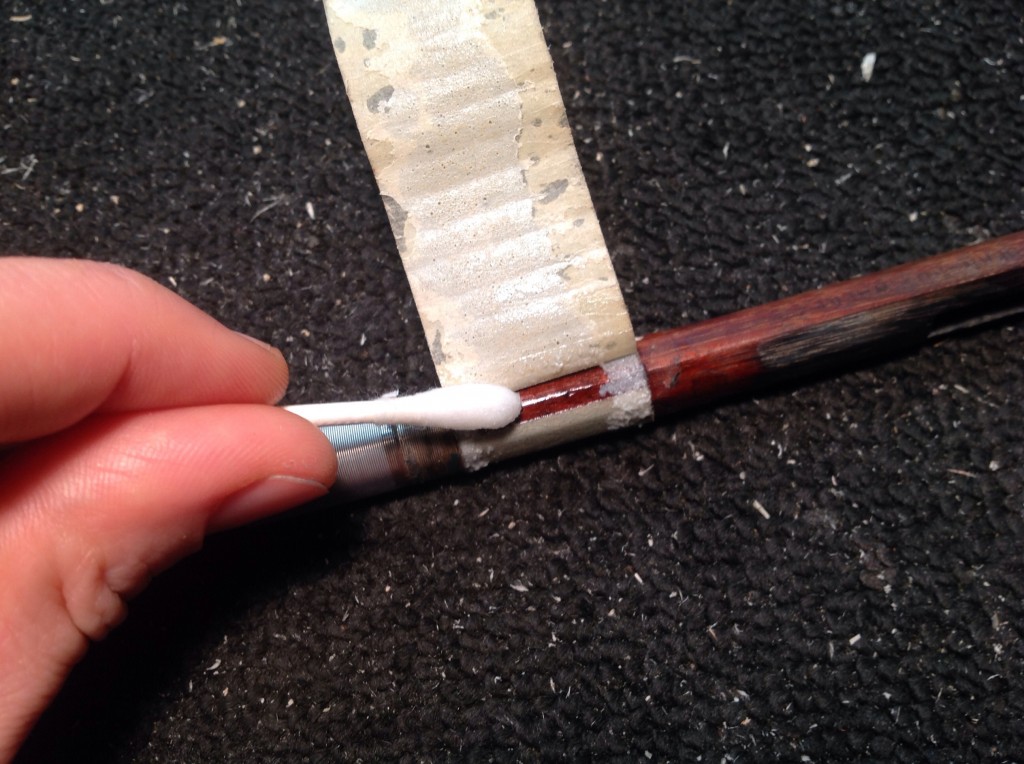
Use water to clean off any more leather remnants, and remove any tape filler material with mineral spirits on a q-tip to prevent ripping out any pernambuco (if the tape looks nice and level and is in good condition uMineral spirits on a q-tip help remove sticky tape and reduce the chance of tearing out any wood during removal.nder previous leather, you can leave it alone). Sometimes silk thread is used under the thumb leather as a filler, it is usually used with a silver wrap. If it is damaged near the frog due to the thumb nail cutting through it, find the silk that is in good condition closest to the frog and secure it with cyanoacrylate by applying it in a thin strip that goes all the way around the stick. Then remove the damaged portion of the silk thread, and fill the space between the wrap and frog with tape (see ‘Mapping Out the Thumb Leather’ to see how to apply tape) so that it is even with the silk thread. If all of silk thread is lower than the silver wrap, use tape on top of the silk to level the surface with that of the silver.
Soldering an Unraveling Wrap
If silver winding starts to unwind use a hemostat to hold on to the end of the winding and rewind it, and let the hemostat hang down to keep silver winding in place. Plug in your soldering iron to heat up. Use fine steel wool to clean and expose the silver winding especially on the bevel of the stick with the frog mortise (what I will refer to as the bottom bevel). On this bevel, use a toothpick to put a dab of flux onto the last two millimeters of silver winding. Take hot soldering iron and melt a little solder onto the tip, then touch it to the flux and end of winding. Try to get a smooth bead to adhere to the last two millimeters of winding on the bottom bevel.
Mask off half of a fine metal file (the whole length of the file) using blue tape (this will help you file the solder to be level with the winding without filing the winding). Prop the taped half of file against your thumb while also resting the taped side of file on the wrap, so that the only part of the unmasked file will meet up with the higher solder. File in this way until solder is flush with the rest of the wrap (I stop filing if I can see the wrap lines start to appear through the solder).
If the winding is made of silk thread or tinsel, use a dab of CA on a toothpick to secure it back down.
As soon as everything looks clean and secure, you are ready to start your new thumb leather.
Mapping Out the Thumb Leather
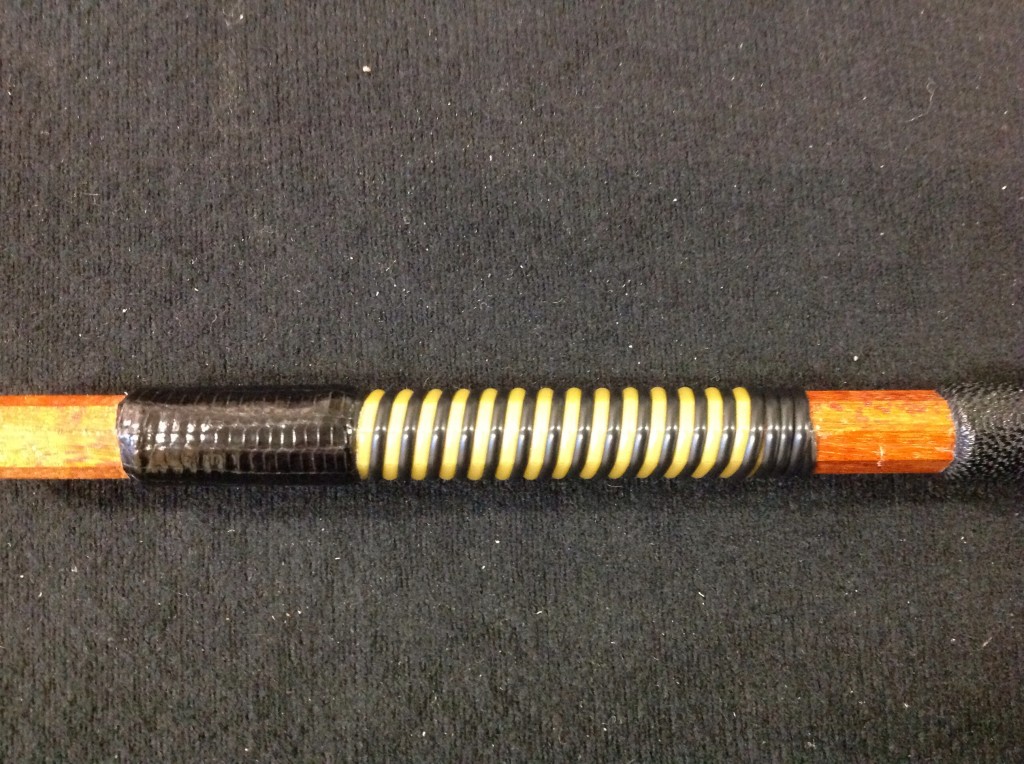
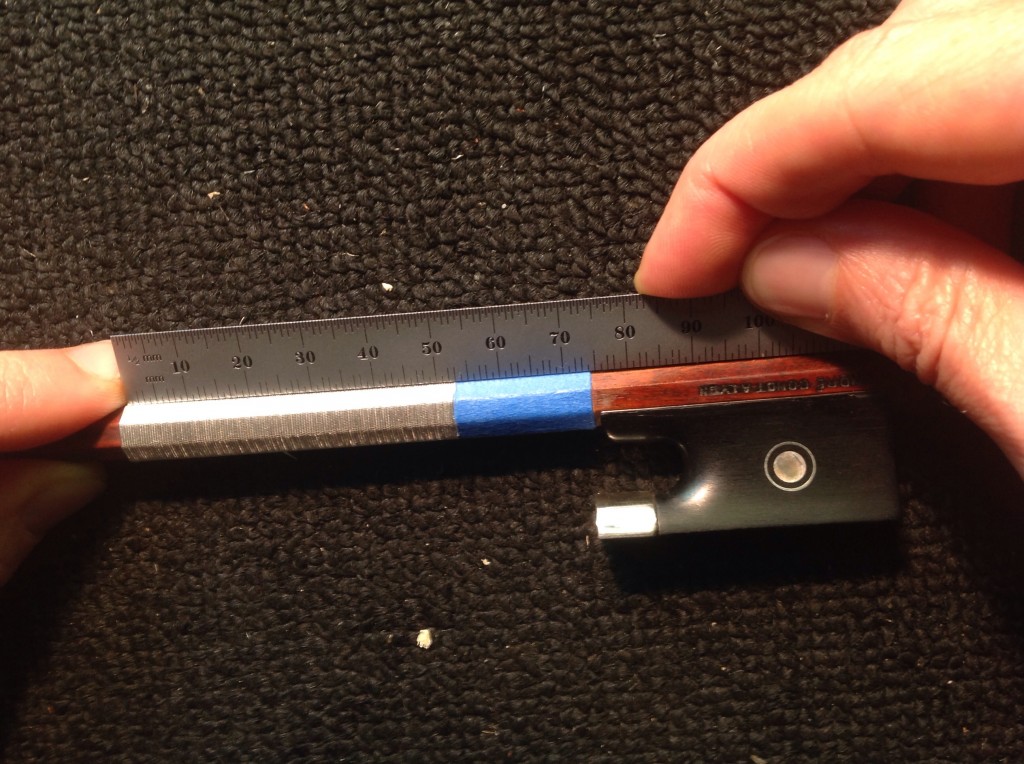
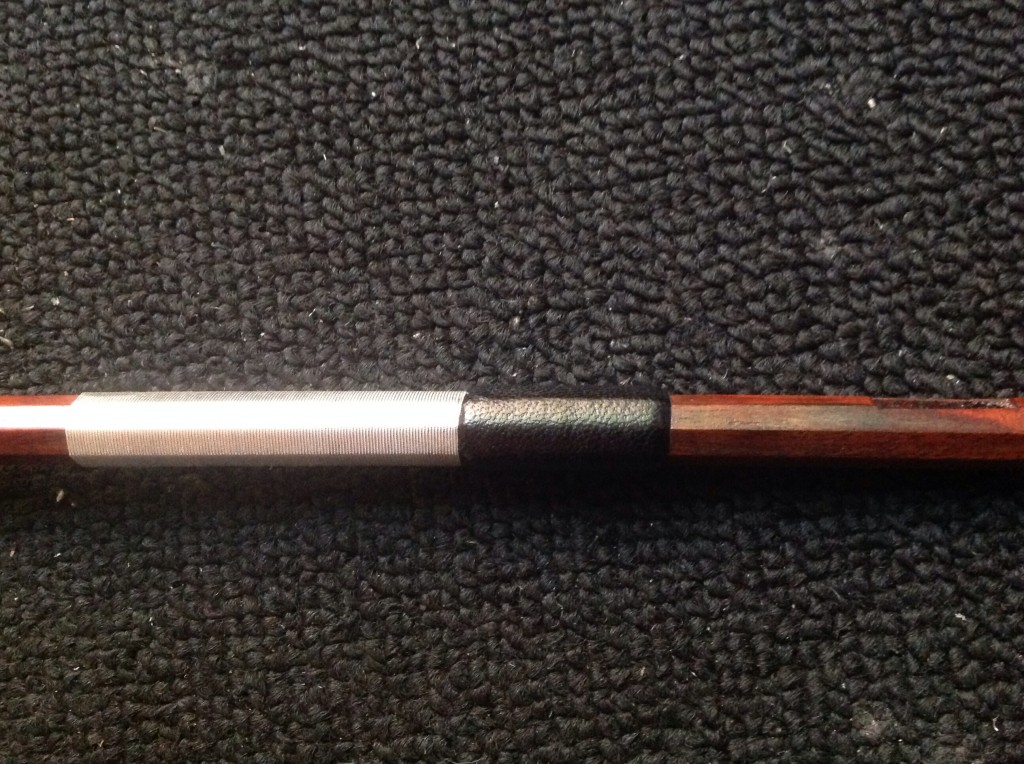
The wrap and thumb leather are strategically placed and measured for weight and balance. The measurements for the wrap and thumb leather are taken from the end of the thumb projection on the frog while the frog is in the furthest most position toward the head of the bow. The entire unit of wrap with thumb leather should start at this point, and the entire length (moving toward the head of the bow) should be 75 mm, divided up into 25 mm of thumb leather and 50 mm of exposed winding. This is our typical proportion for thumb leathers, even bows with slightly shorter wraps; the thumb leather makes up 1/3 of the entire wrap and thumb leather unit. These measurements are our ideal for most bows (violin, viola, cello, and bass) figuring we all have similar sized hands, no matter how long or short our bows are. However, some fine historical bows have a much smaller thumb leathers than our proportions.
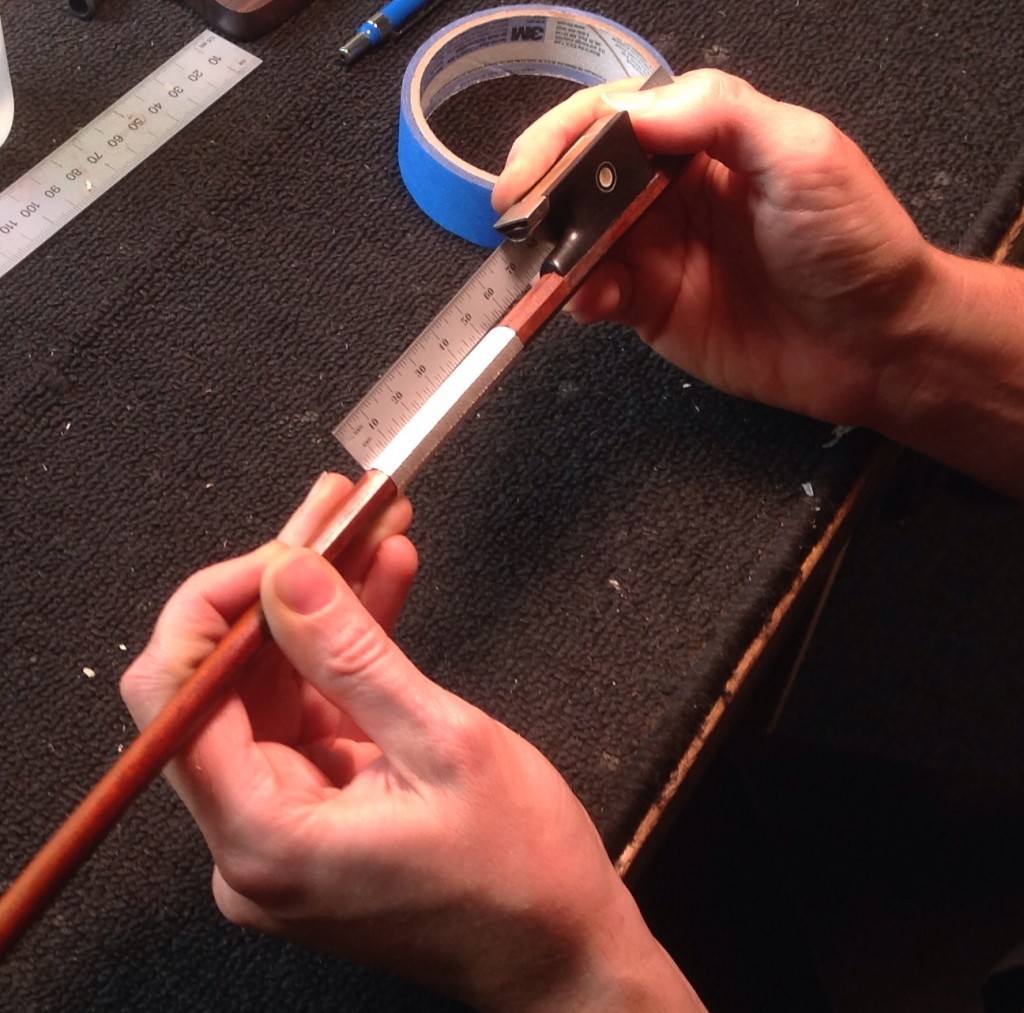
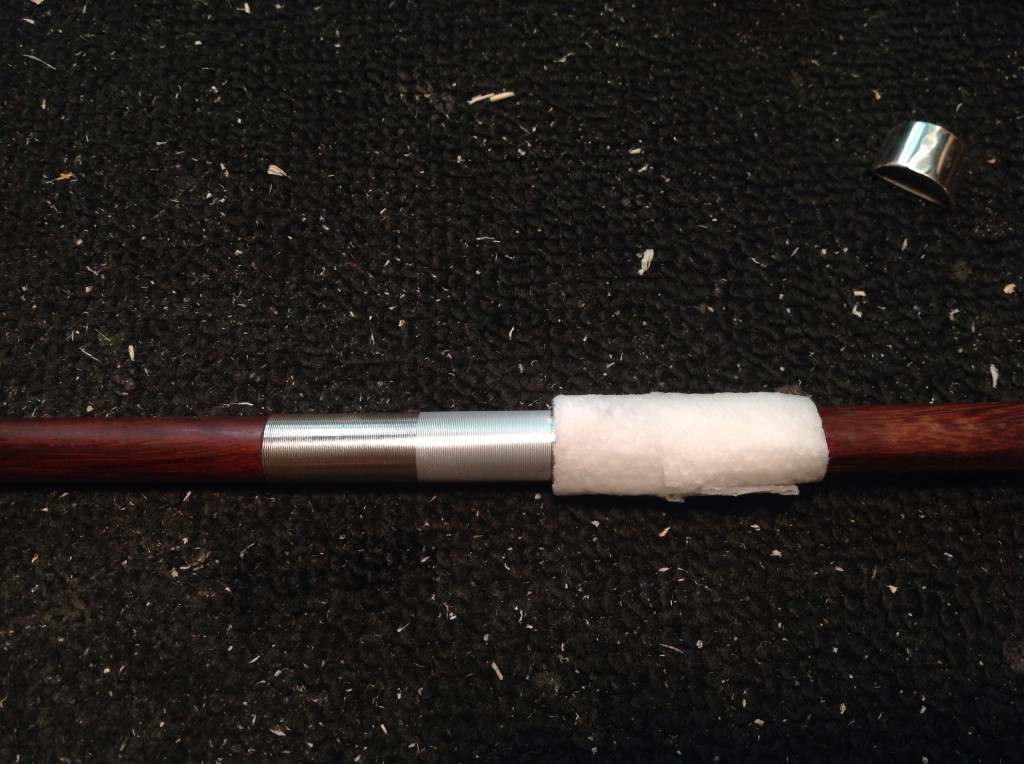
If my bow winding stops before the thumb projection of the frog (which is quite normal), I will need to use tape between where the winding stops and the thumb projection on the frog to level the surface of the stick with the winding to create a smooth surface on which to glue my thumb leather. I do this by using blue painters tape that I cut to be a 90 degree angle and I start it on the edge of the bottom bevel (the one with the mortise), place it directly on the stick at the end of the winding with no gaps in between).
I start rolling the stick in my hand, wrapping the tape around the stick until the surface of the tape is level with the surface of the winding on all bevels of the stick (check with a ruler or small straight edge, or better yet, check the width with digital calipers and compare it to width of stick with the winding).
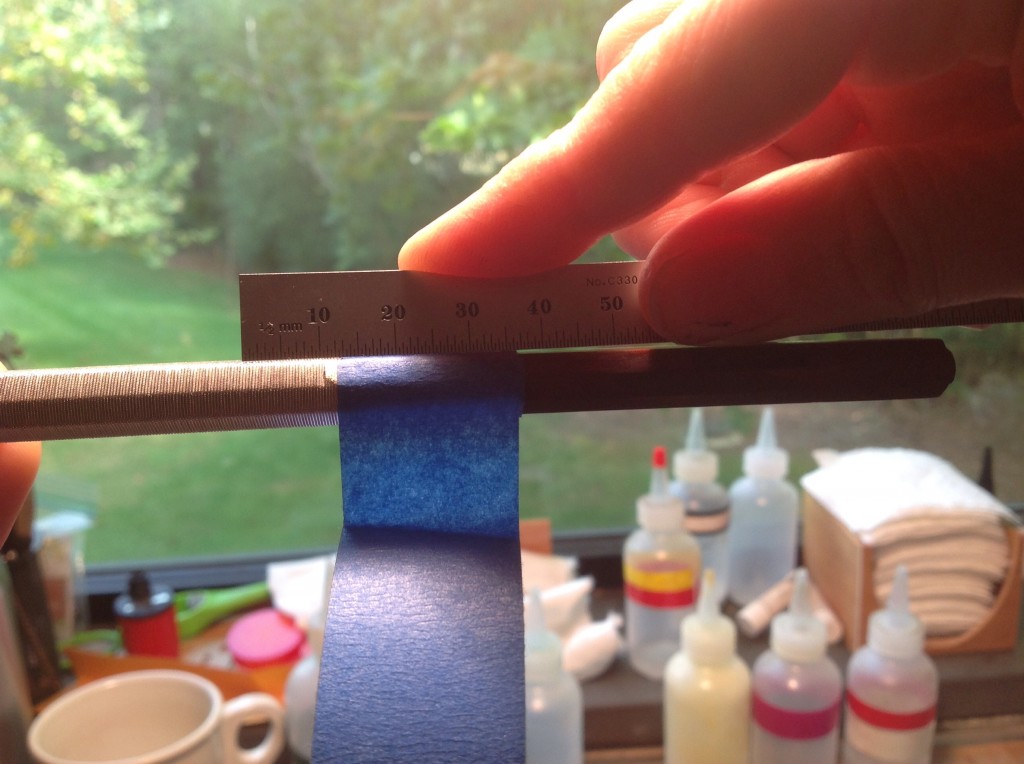
Remember where you started the tape? Yes, the edge of the bottom bevel. So then try to cut at that same spot to finish the tape at a clean 90 degree angle. Use scissors or a knife. Starting and stopping the tape at the same spot will help avoid getting lumps in the thumb leather.
Unless you are lucky, the tape is probably not the exact width that you need to make a 75 mm long unit (wrap + thumb leather), so measure 75 mm from end of wrap and mark on tape where 75 mm is located. Double check this is the right spot by putting frog in the mortise in the furthest most position toward the head of the bow. The end of the thumb projection should meet up with this mark.
If they don’t match, mark where the end of the thumb projection actually is, this is more important. If the wrap and thumb leather length doesn’t equal 75, that is OK, but it is the ideal number. The only way to change it, then, would be to do a new wrap.
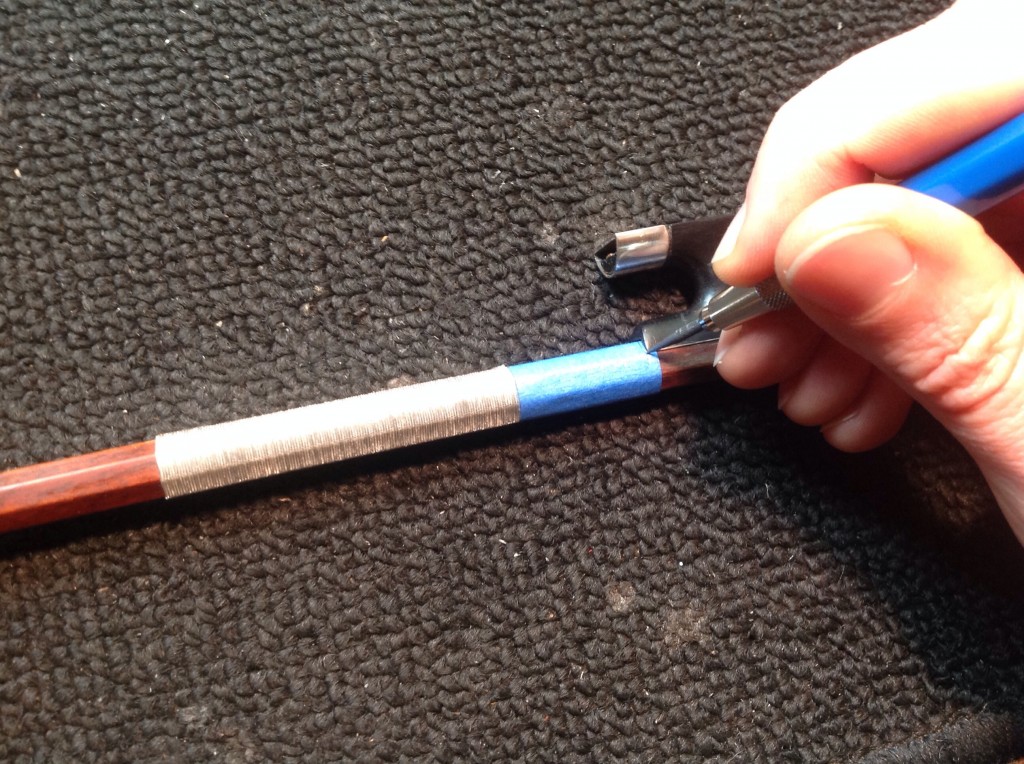
So, this mark that you just made is where you’d like the thumb leather to end, and since the leather has to overlap the tape slightly and curl down and over to meet the stick, I cut the tape 1 mm short of the thumb projection. Cut the tape with a knife or with a sharp razor blade in a blade holder all the way around stick, as straight as possible, on each bevel, being careful not to cut into the stick.
Peel away the tape, and on the last bit that is taped directly to the stick, use mineral spirits on a q-tip to remove it. Check it with the frog, that the tape is 1 mm away from thumb projection.

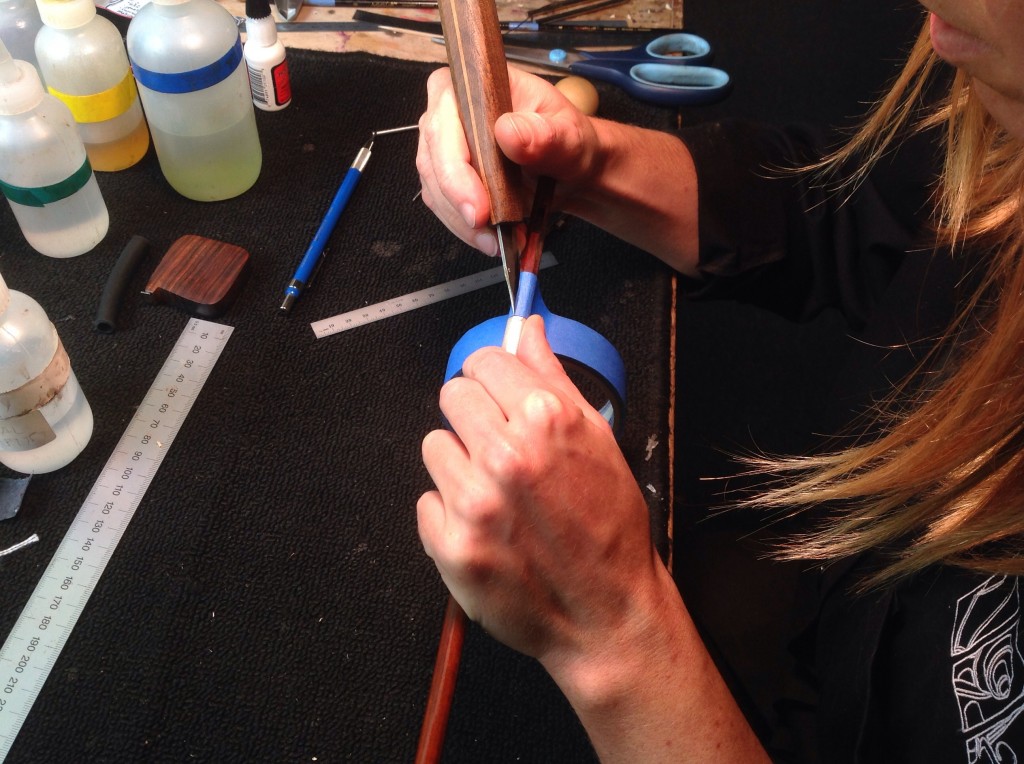
Cutting and Measuring the Leather
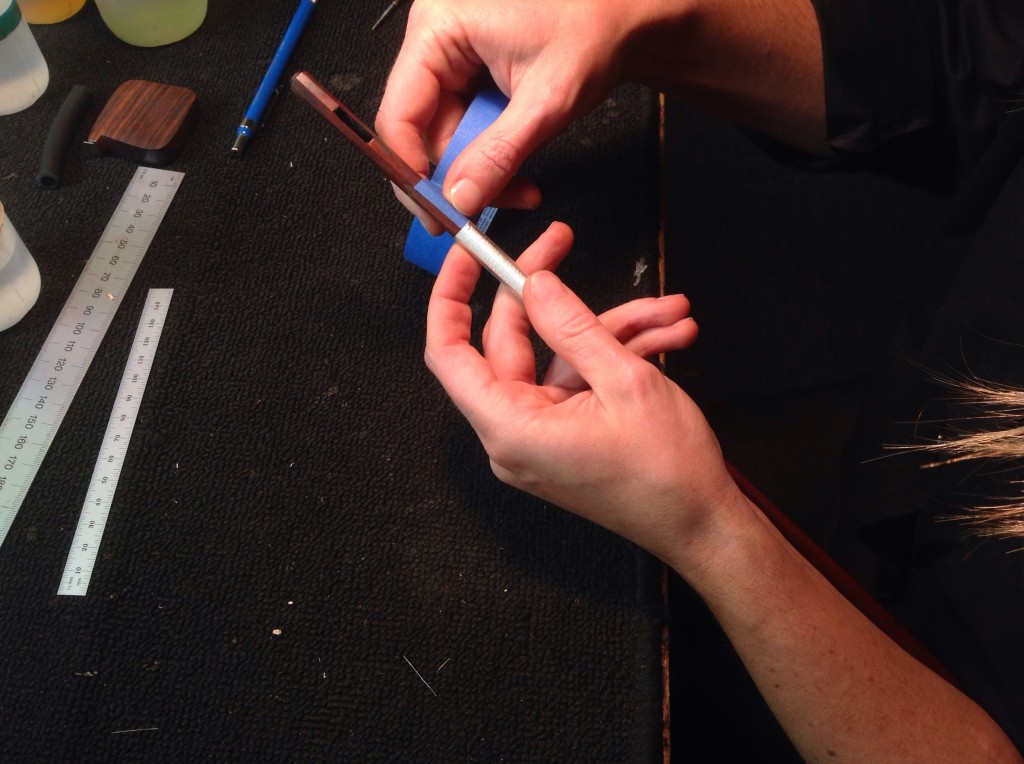
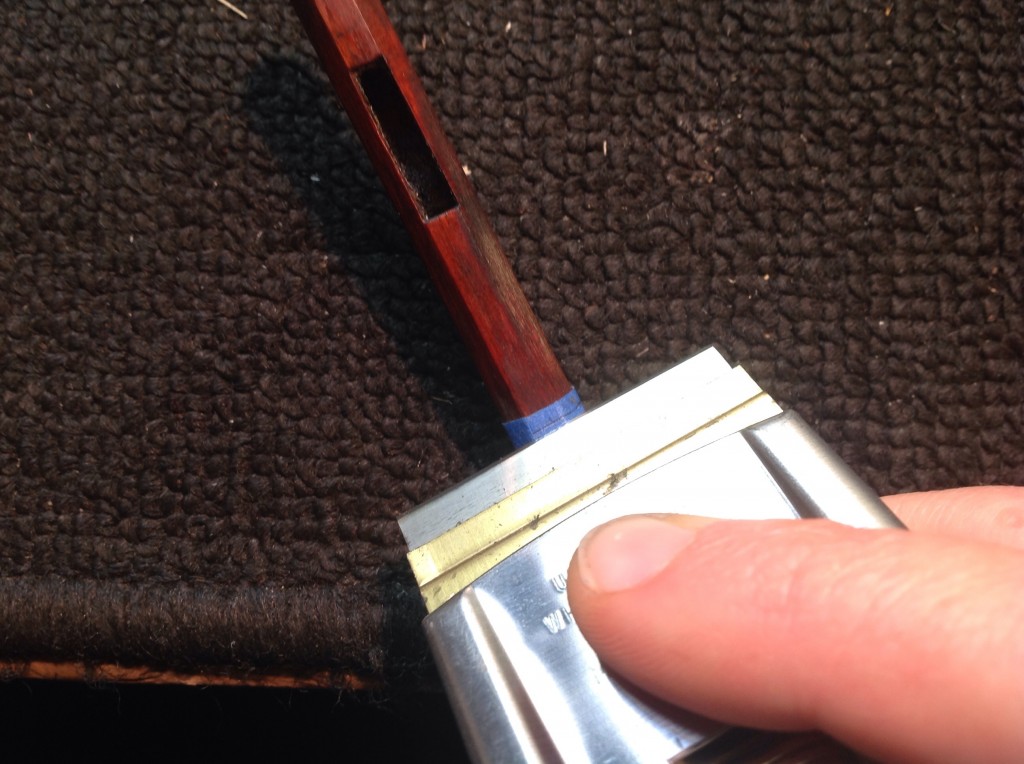
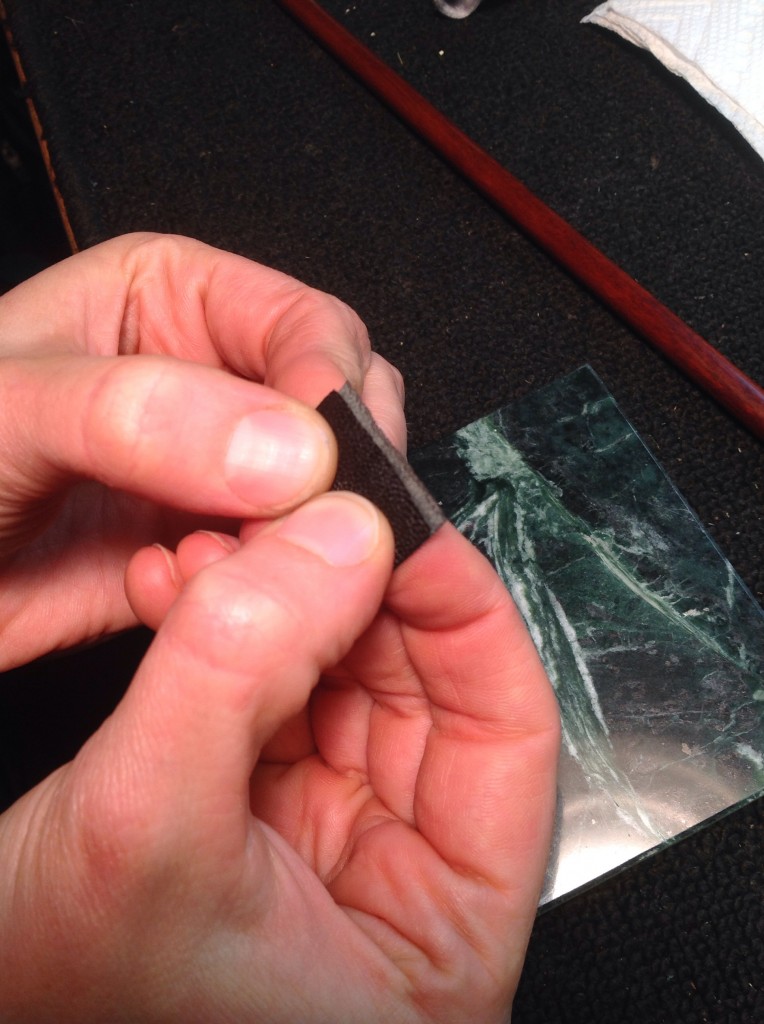
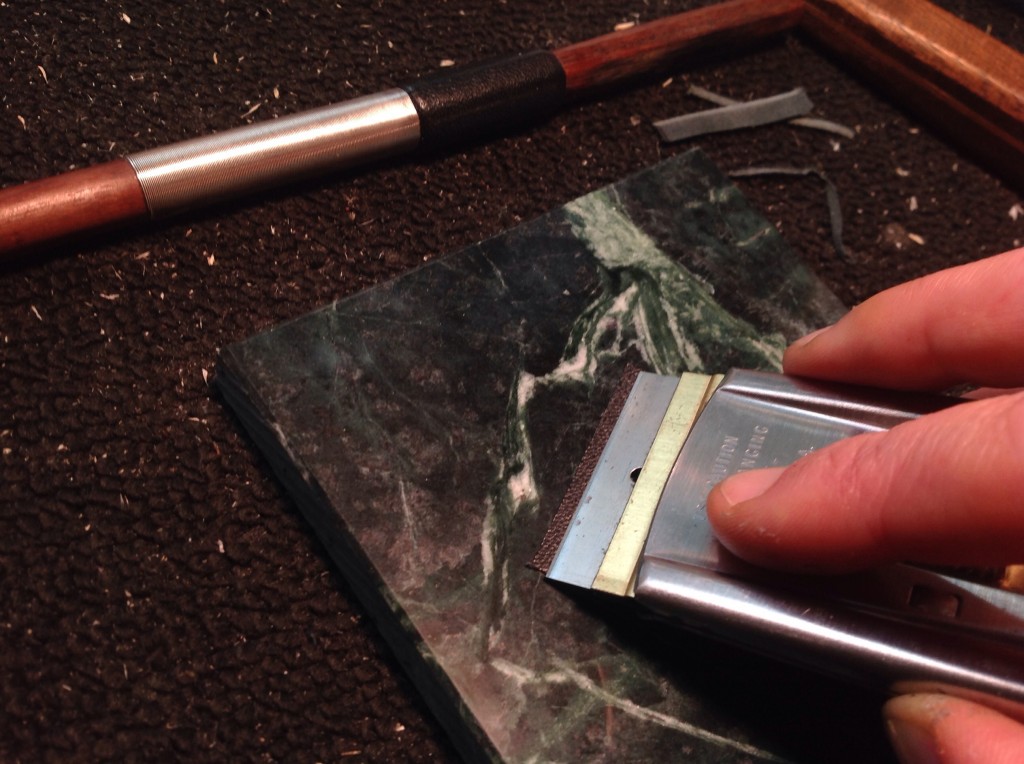
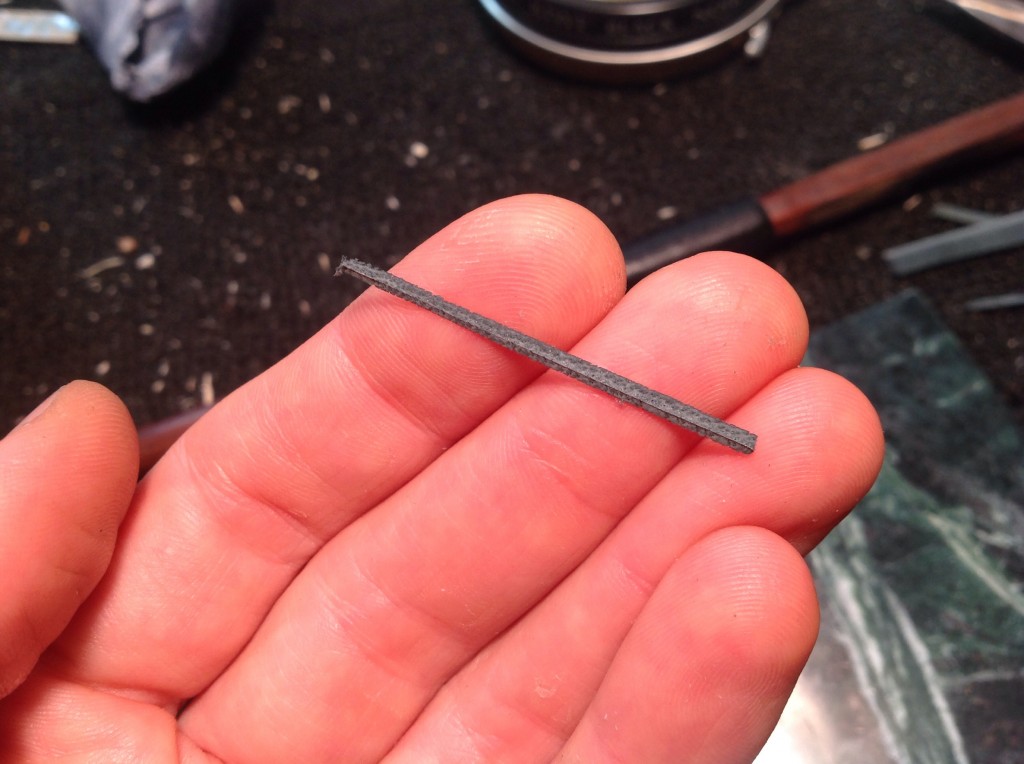
Take a strip of leather and cut a long bevel on the end. Do this by putting a razor-blade in a holder and stropping it so you can get a nice even cut. Hold leather, unfinished side up, against tile and hold the blade at a shallow angle to get a longer bevel, push down and forward to cut the leather smoothly.


A nice cut will show the texture of the top of the leather at the very end of the cut, a ‘feather-like’ edge. We will call this bevel 1.
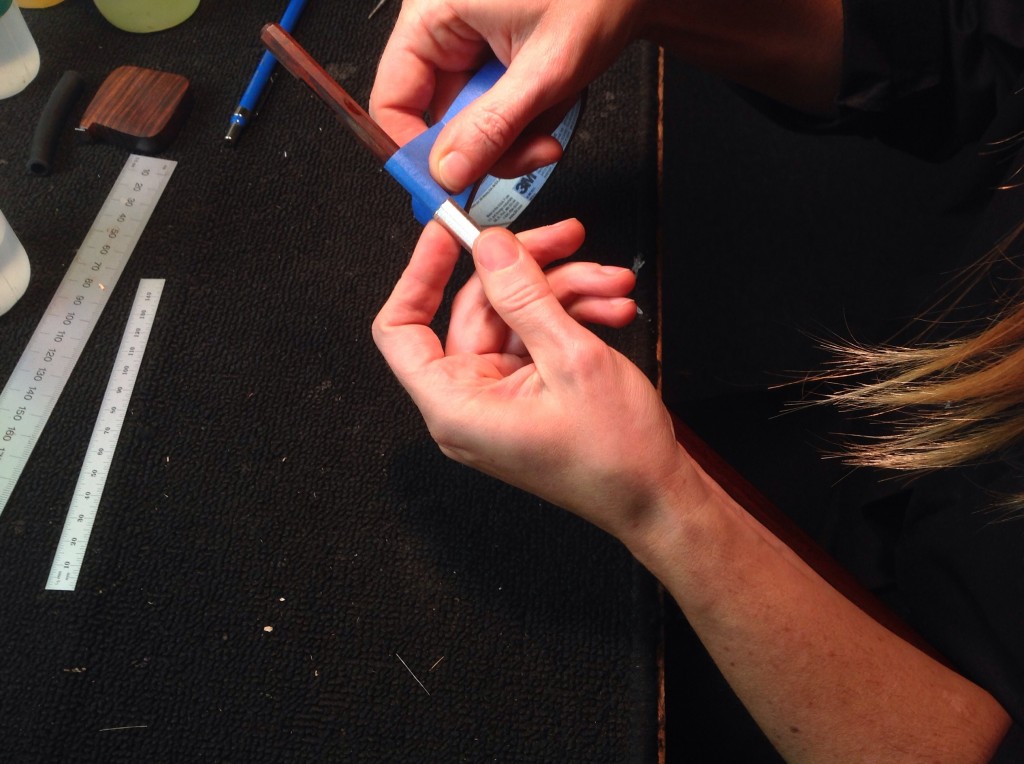
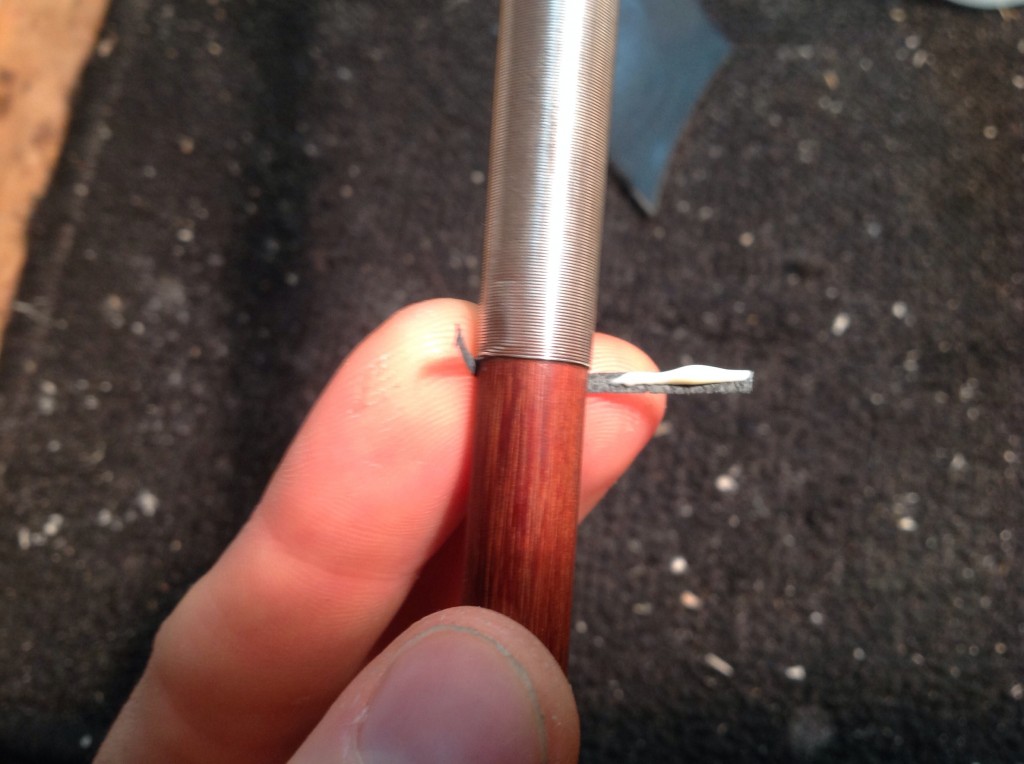
Then wrap the leather around the stick over the taped area, pulling it taut and mark with a pen on the inside of the leather where bevel 1 ends. This is where we will start the cut of bevel 2. Sometimes I like to cut the leather from the leather stock at this point, so measure 10 mm longer than the line you just made and cut it off the stock. Repeat the process for cutting bevel 1 just on the other end of the leather for bevel 2. Try to make it as parallel to bevel 1 as possible, and at about the same angle.
Make sure to start the cut where you marked the line, this will give you no lumps in the thumb leather. Check it after you cut it by wrapping it around the stick again and seeing if the bevels overlap each other evenly, so where one bevel begins, the other ends, and vice-versa.
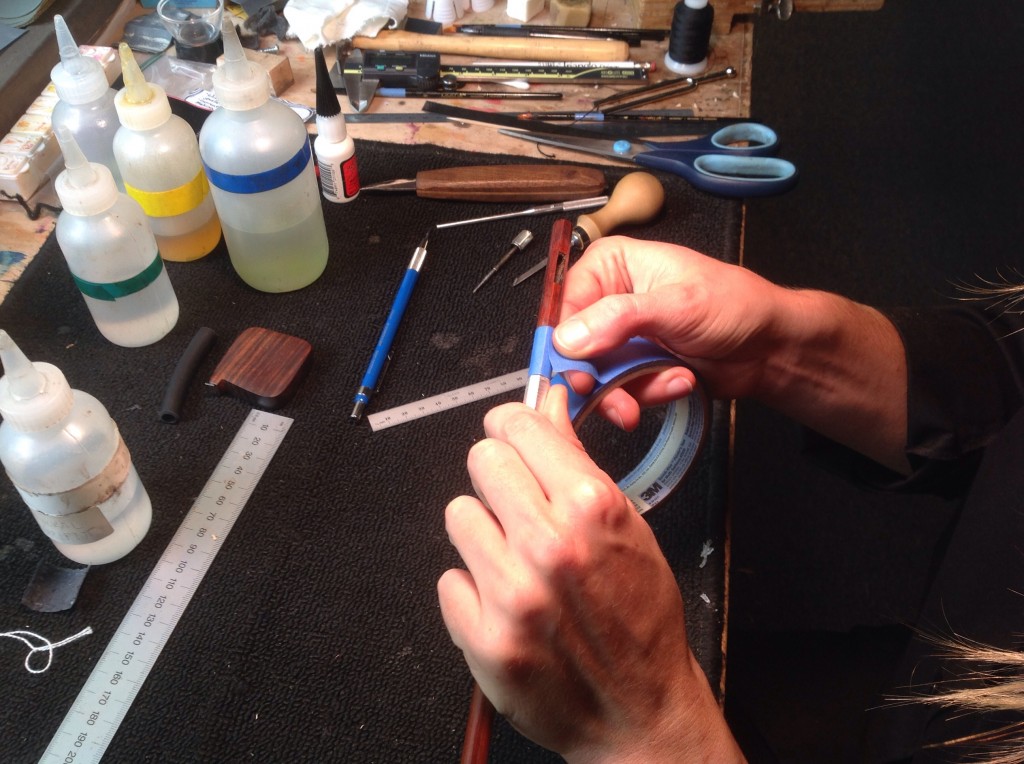
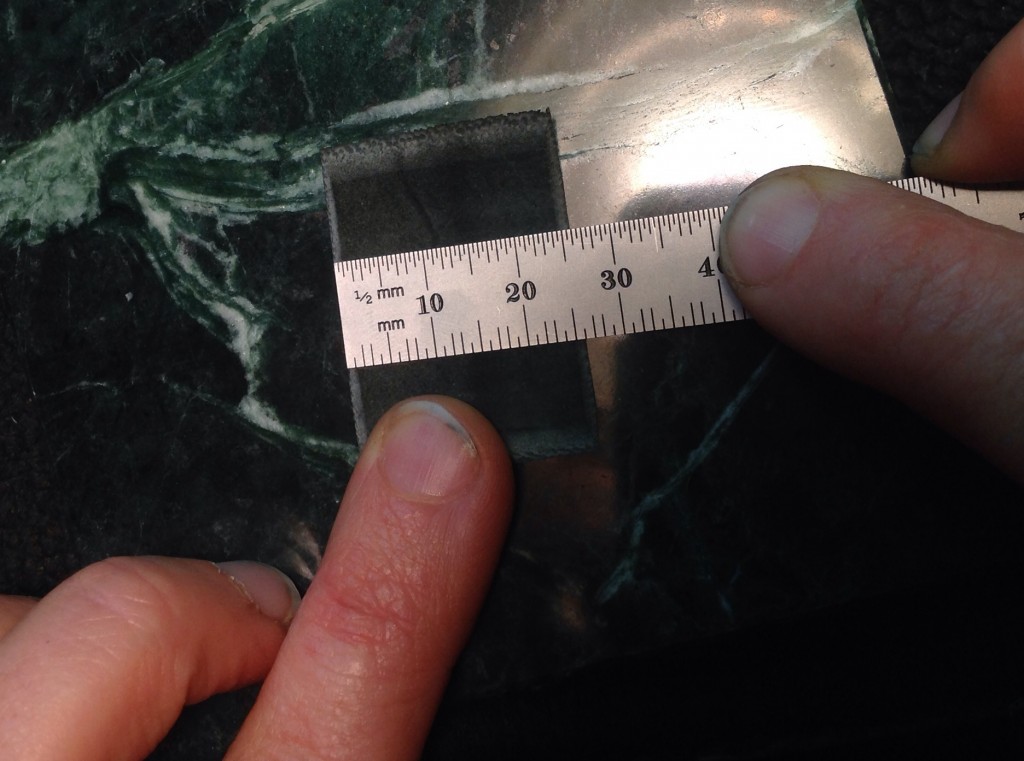
To cut the width of the leather, think about the finished width being ideally 25 mm, and because these sides will be beveled too, they will fold down onto the stick, thus shortening their length slightly when glued, so the leather should measure just shy of 26 mm.
These bevels will be cut at a steeper angle than bevels 1 and 2 and lining up your razor, it will be perpendicular to bevels 1 and 2. Cut one side first until you get a nice straight steep cut (this bevel will be shorter because of its steepness), then measure your width and mark out 26 mm with a pen. Place your razor on the mark and square it off to all the bevels, and cut a steep angle here as well. Try folding the leather in half now to see if all four corners match up, or if one is longer than the others; some squareness might need correcting.
Now measure the top of the leather, is it just shy of 26mm? If you have extra length, you have some room to correct any off-squareness of the leather. Keep taking little cuts off the sides, until it’s square and the top of the leather measures a little less than 26mm.
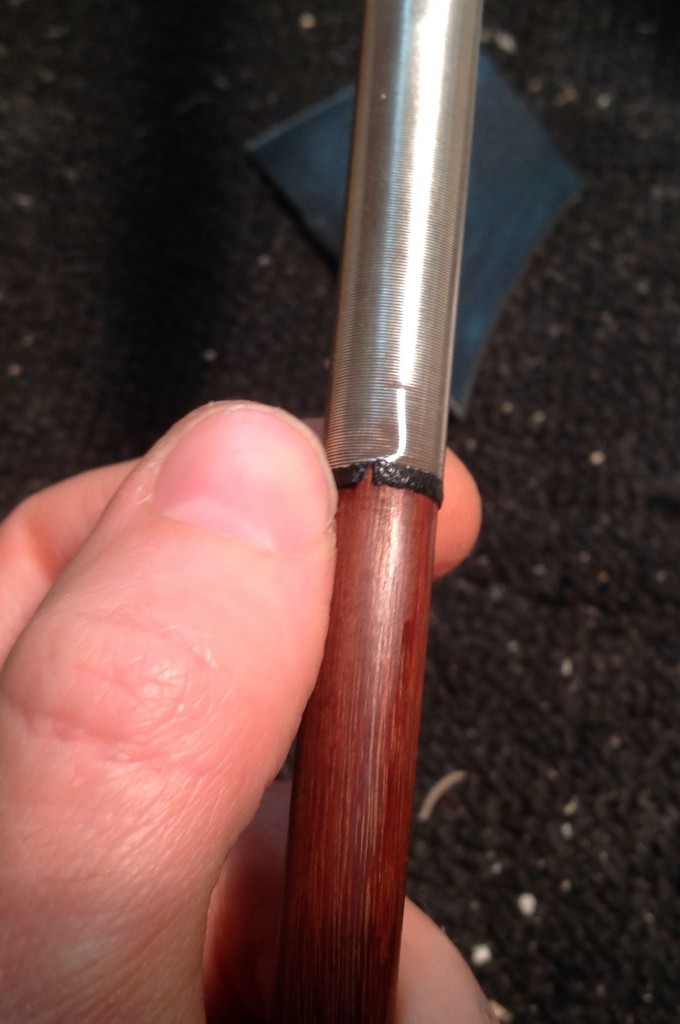
Now wrap the leather around the stick in the correct postion: bevel 1 of the leather should start on the bottom facet of the stick (with the frog mortise) and after wrapping the leather around the stick, the overlapping top bevel 2 of the leather should pass the starting facet and end on the facet after that (Not on the side where the player’s thumb would be). Put the frog on in furthest position toward the head, and line up the end of the leather with the thumb projection and check out that the ends of the leather match up well on the stick when rolled all the way around.


If everything looks good, then you’re ready to glue.
Gluing the Leather
Keep pinning the leather in place with one hand to keep it in position. Then with the other hand apply an ample amount of aliphatic resin to half of the inside of the leather to be glued down first (bevel 1). Use your thumb to squeegee the leather down against the stick and hold it there for a little while until the leather sticks on its own. Apply aliphatic resin to the other half of the inside of the leather and squeegee that down while pulling it taut.
Try to keep the leather in position while gluing it so that the edges match up evenly.
Clean up the bulk of excess glue using a clean damp paper towel. Use a thick rubber band that’s cut to be a long strip, and wind it tightly over the leather, overlapping itself just a little each time to cover the entire leather. Leave it on for about 1 min.
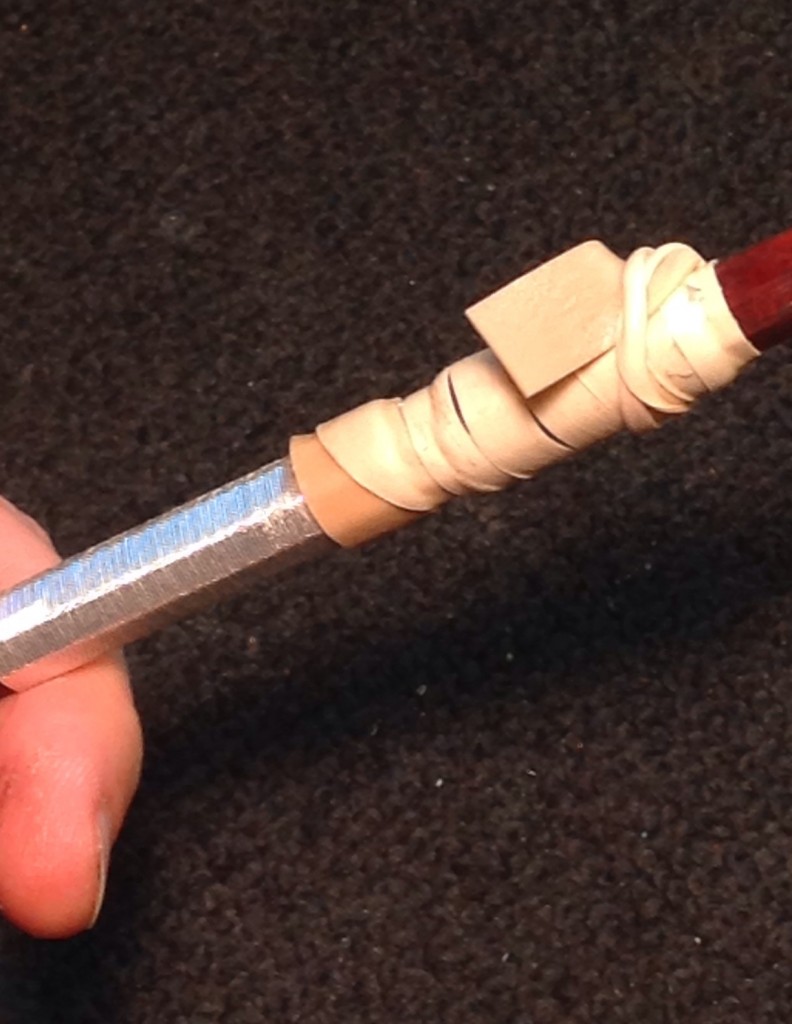
Unwrap the rubber band and then re-wrap it, but this time just wrap it really tightly over the ends of the leather and loosely in the middle, this is to help adhere the ends tightly to the stick.
Leave it for about 2min. Unwrap it again and clean the glue with a clean damp paper towel more thoroughly this time. Check to see that the ends are curled down and adhered to the stick. If not, stick a little aliphatic resin in any gaps and re-rubber band it.
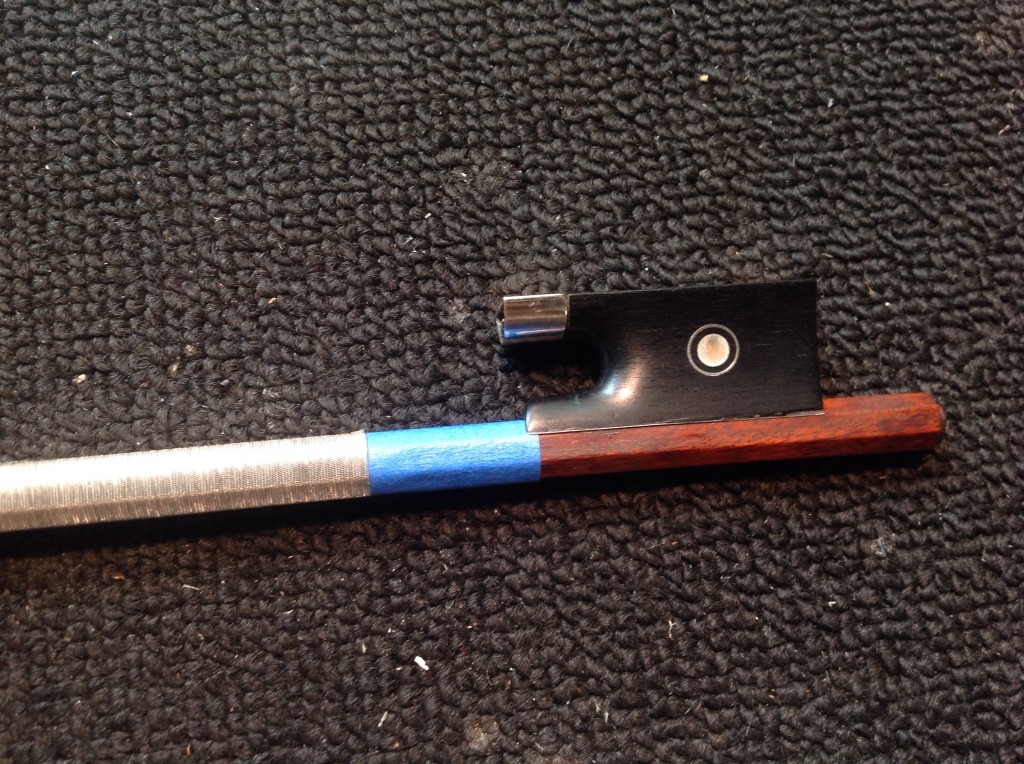
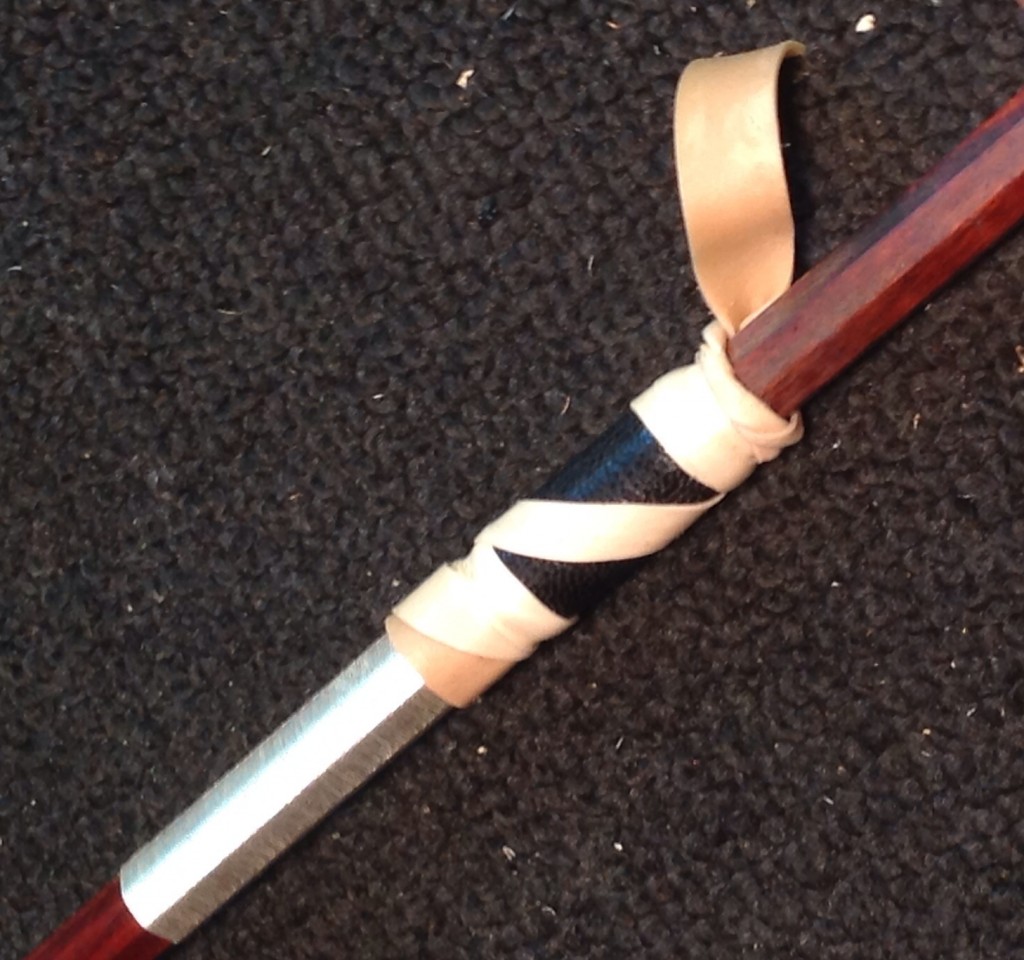
Then take a flat wooden paddle and while gently pushing down on thumb leather, roll the stick and thumb leather on a clean wooden surface, this helps get out the rubber band creases on the surface. Also, burnish each facet of the leather to make it look faceted.

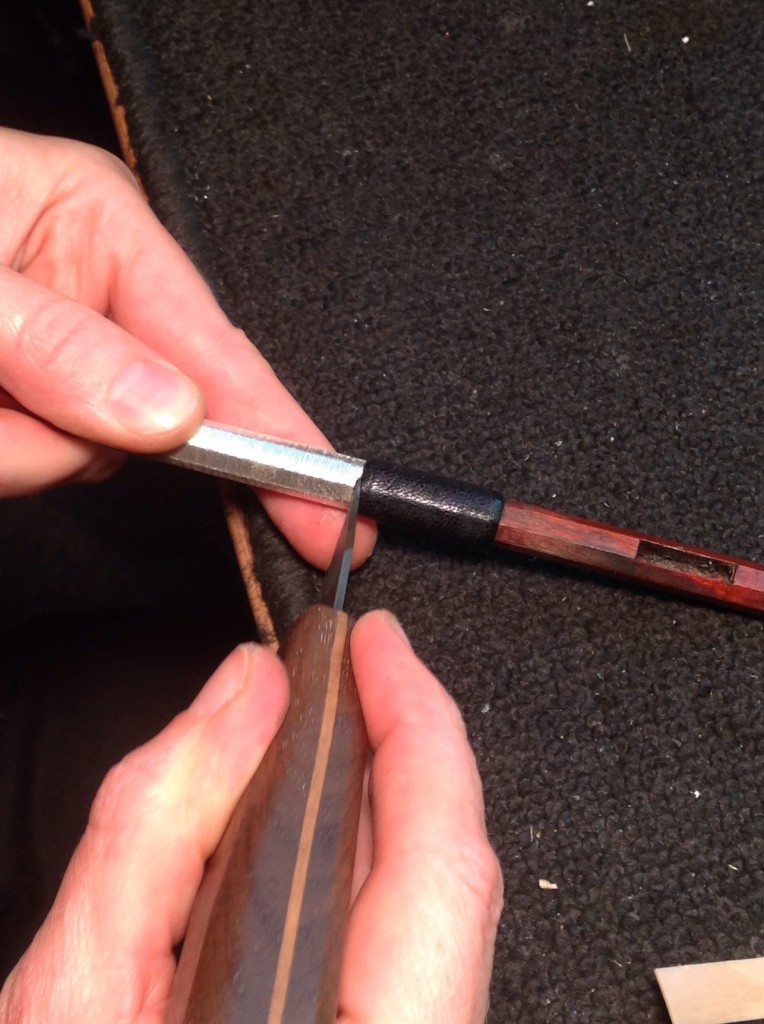
If there are any slightly uneven parts of the thumb leather where it meets the bow stick, CAREFULLY cut the edge to be a straight line with a knife (barely cut any leather if possible, just until it looks clean).
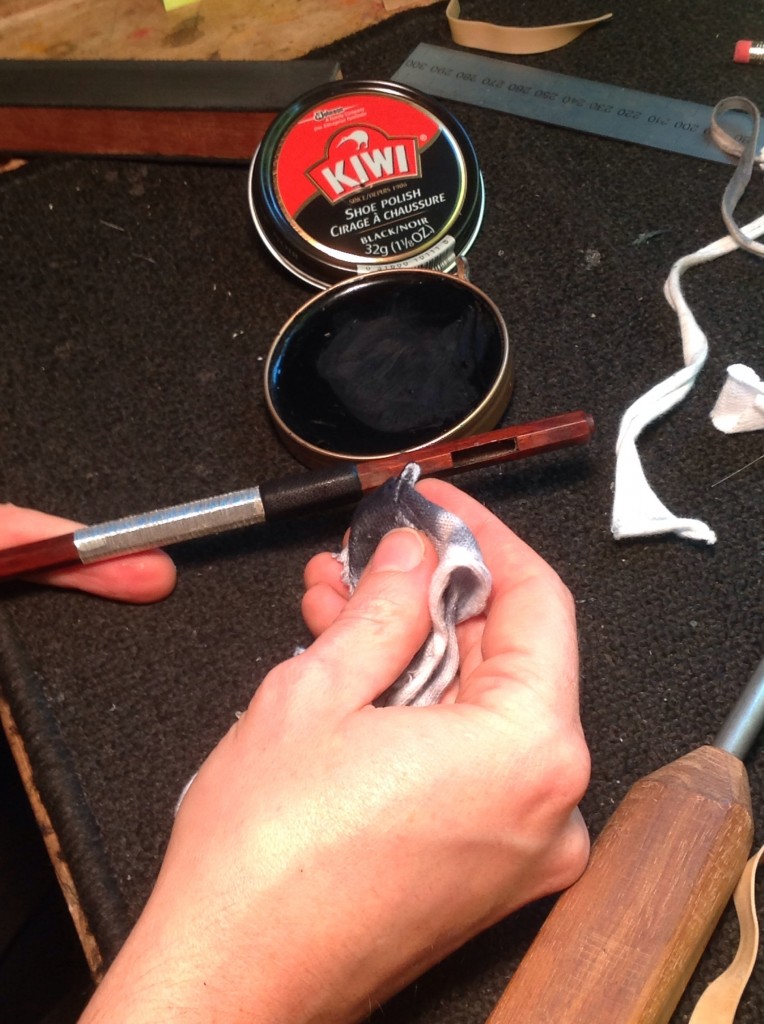
Apply black shoe polish to a black leather and wait till it fogs up, and buff it out with a clean soft piece of cotton.
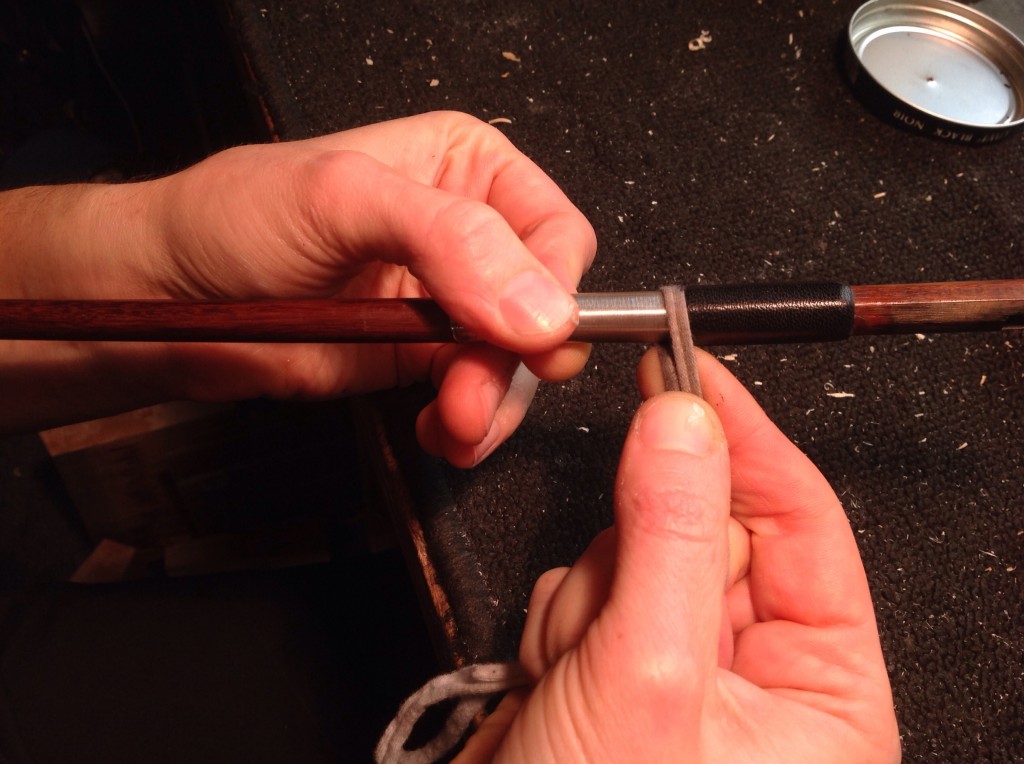
Get the ends shiny and sealed down with a thin piece of cotton or a soft shoelace that you can wrap around the ends of the leather while you turn the stick in your hand. Have a light touch when dealing with a tinsel or fragile looking silk wrap. Don’t unravel the wrap next to your brand new thumb leather.

There you have it, a new, proportional, shiny, seamless thumb leather!
Nerd Alert!
If you are putting a thumb leather on a stick with a silver wrap (this is not necessary for silk, tinsel or any other kind of wrap but silver), you should also make a nerd to go on the end of the wrap. This helps the wrap stay in place on the other end. To make one, take a piece of leather that is almost as wide as your razor blade and on the underside of the leather cut a med-short bevel, then flip the leather over to it’s top and cut a very steep bevel 1 mm away from the edge.
This little strip is double beveled on the underside and will fit nicely between the end of the silver wrap and the stick. As on the thumb leather, try to slightly bevel one end of the strip with a razor, wrap it around the stick and mark with a pen where it meets up. Bevel the other end starting at this mark. You can make it slightly short because as you glue it, it might stretch. The nerd starts where the wrap starts (usually the bottom bevel) and it should overlap itself slightly at the end. Glue the nerd using a little bead of aliphatic resin.
Clean up the glue with a damp paper towel, cut off any imperfections, and polish.
Things to Admire About Your New Thumb Leather (and some tips for future thumb leathers)
Can you see a seam on the leather?
Hopefully it’s barely visible! If it is visible, next time pay attention to the feather-edge of your bevel and try stropping your razor. Also, think about how the bevels overlap each other. If there is a lump, they might overlap each other too much, in which case, one of the ends needs to be cut a little shorter.
Does the frog thumb projection meet up exactly where the thumb leather starts?

Yes! If not, next time double check the position of the leather before gluing and make sure to not move it around when gluing: keep one finger clamped down on it until one side is tacked down.
Does the wrap and thumb leather length equal 75mm, and is the thumb leather 25mm long?
Yes! If not, and it doesn’t have to do with the wrap being in the wrong place, then check the placement of the thumb leather, and the length of the thumb leather. Or perhaps the leather stretched a bit, but take note and try to make the correction in the next leather by playing with the width .5mm at a time until it ends up being 25mm, to see if that helps.
Any lumps in the thumb leather?
No! If there are, maybe your filler tape was uneven with the height of the wrap or there was a gap. Maybe you didn’t get out the rubber band indentations with the wooden paddle, but you can still try to fix this by dampening a paper towel to dampen the leather slightly and try this again, don’t let leather get too wet though, it could come unglued.
Notes
1. We use Russel’s ‘Genuine ‘OASIS’ Goatskins,’ which are mostly used for bookbinding. We recommend ordering the ‘third quality’ of goatskin, which is more affordable and if there are any imperfections, you can simply discard small sections without much waste. We purchase ours through the Talas website. BACK TO POST